Homemade Choco Tacos
Remember those crispy, chocolate-dipped treats from your childhood? I’m talking about Homemade Choco Tacos, the ultimate indulgence that combines a waffle shell with creamy ice cream and a crunchy chocolate coating. Growing up, I’d beg my parents to stop at the ice cream truck just for one, but now that I’m older, I’ve mastered making Homemade Choco Tacos right in my own kitchen. It’s surprisingly simple, and the result is even better than the original—fresher, customizable, and way more fun to share with family.
What I love most about whipping up Homemade Choco Tacos is how they bring back those nostalgic vibes while letting me get creative with flavors. In my experience, the key is starting with a homemade waffle batter that crisps up perfectly. Whether you’re hosting a summer party or just craving a sweet treat, these Homemade Choco Tacos will steal the show. Let’s dive into the recipe—trust me, you’ll be hooked after the first bite.
I’ve linked some of my other favorite dessert recipes here, like this molten chocolate cake for chocolate lovers or these lemon blueberry cookies if you want a citrus twist to pair alongside.
Grab This Chef Knife Now - Almost Gone!

- Stays Razor-Sharp: Ice-hardened blade keeps its edge longer than ordinary knives
- Superior Grip Control: Unique finger hole design gives you perfect balance and safety
- Built to Last a Lifetime: Premium stainless steel blade with elegant beech wood handle
- ✓ Finally, a knife that stays sharp and feels comfortable in my hand
- ✓ Professional quality without the premium price tag
- ✓ Makes meal prep faster and more enjoyable
⏰ Only a few items left in stock - order soon
Key Takeaways:
- Homemade Choco Tacos offer a customizable twist on the classic treat, letting you choose your favorite ice cream flavors.
- Prep time is just 30 minutes, with most of the work in assembly—perfect for quick desserts.
- The combination of crispy shell, creamy filling, and chocolate crunch delivers an unbeatable taste explosion.
- Chill the shells briefly before filling for the best texture in your Homemade Choco Tacos.
- Store extras in the freezer for up to a week to enjoy Homemade Choco Tacos anytime.
Why You’ll Adore This Homemade Choco Tacos
Endless Customization Options: One of the best parts about making Homemade Choco Tacos is how easy it is to tailor them to your taste. Swap vanilla ice cream for strawberry or add sprinkles inside—I’ve tried mint chocolate chip and it was divine. You’ll feel like a pro baker experimenting with these.
Beats Store-Bought Every Time: Let’s be honest, those packaged versions can’t compare to the fresh crunch and real flavors in your own Homemade Choco Tacos. The homemade shells are lighter and crispier, and you control the sweetness. It’s a game-changer for dessert nights.
Family-Friendly Fun: Involving kids in assembling Homemade Choco Tacos turns cooking into a joyful activity. Watch their eyes light up as they dip the tacos in chocolate—it’s messy but memorable. Plus, everyone gets exactly what they want.
Quick and Impressive Results: You won’t believe how fast these come together, yet they look like something from a fancy ice cream shop. Share your Homemade Choco Tacos at parties, and you’ll be the hit of the gathering. Now, you might be thinking it’s complicated, but here’s the thing—it’s not!
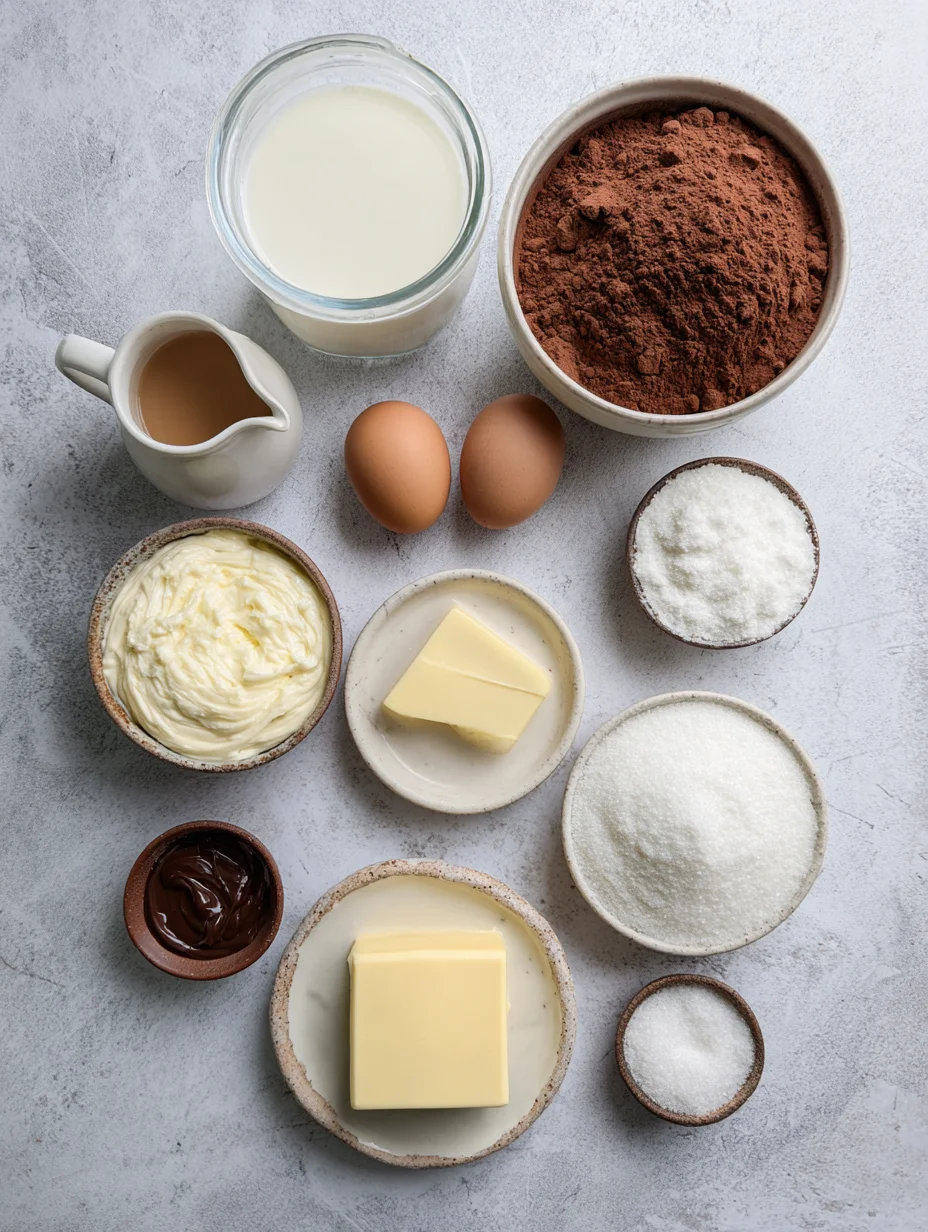
Essential Ingredients for Homemade Choco Tacos
Waffle Batter Mix: The base of your Homemade Choco Tacos starts with a simple batter made from flour, cocoa powder, sugar, eggs, and melted butter. This creates the signature crispy shell that holds everything together without sogginess. I always add a pinch of salt to balance the sweetness, making each bite more flavorful. In my experience, using room-temperature eggs ensures a smooth mix.
Vanilla Ice Cream: Creamy vanilla ice cream is the classic filling for Homemade Choco Tacos, providing that cool, melt-in-your-mouth contrast to the warm shell. Soften it slightly for easy scooping, but not too much or it’ll leak. What I find interesting is how high-quality ice cream elevates the whole treat—go for one without too many additives.
Chocolate Coating: Dark chocolate chips melted with a bit of coconut oil form the glossy dip for your Homemade Choco Tacos, adding richness and a satisfying snap. Finely chopped peanuts rolled on top give the authentic crunch. This combo not only seals in the ice cream but also boosts the nutty flavor profile.
How to Make Homemade Choco Tacos
Prepare the Waffle Shells
Start by whisking together the flour, cocoa, sugar, eggs, butter, and milk until smooth—this batter is the heart of your Homemade Choco Tacos. Heat a waffle iron or crepe maker to medium, then pour in small amounts to form taco-shaped shells. Cook for 2-3 minutes until crisp, pressing gently to shape them over a rolling pin while warm. The aroma of chocolatey goodness will fill your kitchen, making it hard to wait.
Fill with Ice Cream
Once the shells cool slightly, scoop softened vanilla ice cream into each one, packing it gently but firmly. For extra flair, swirl in some fudge sauce before freezing briefly to set. Timing is key here—don’t let the ice cream melt too much, or your Homemade Choco Tacos might get messy. I love adding a cherry on top for that retro touch.
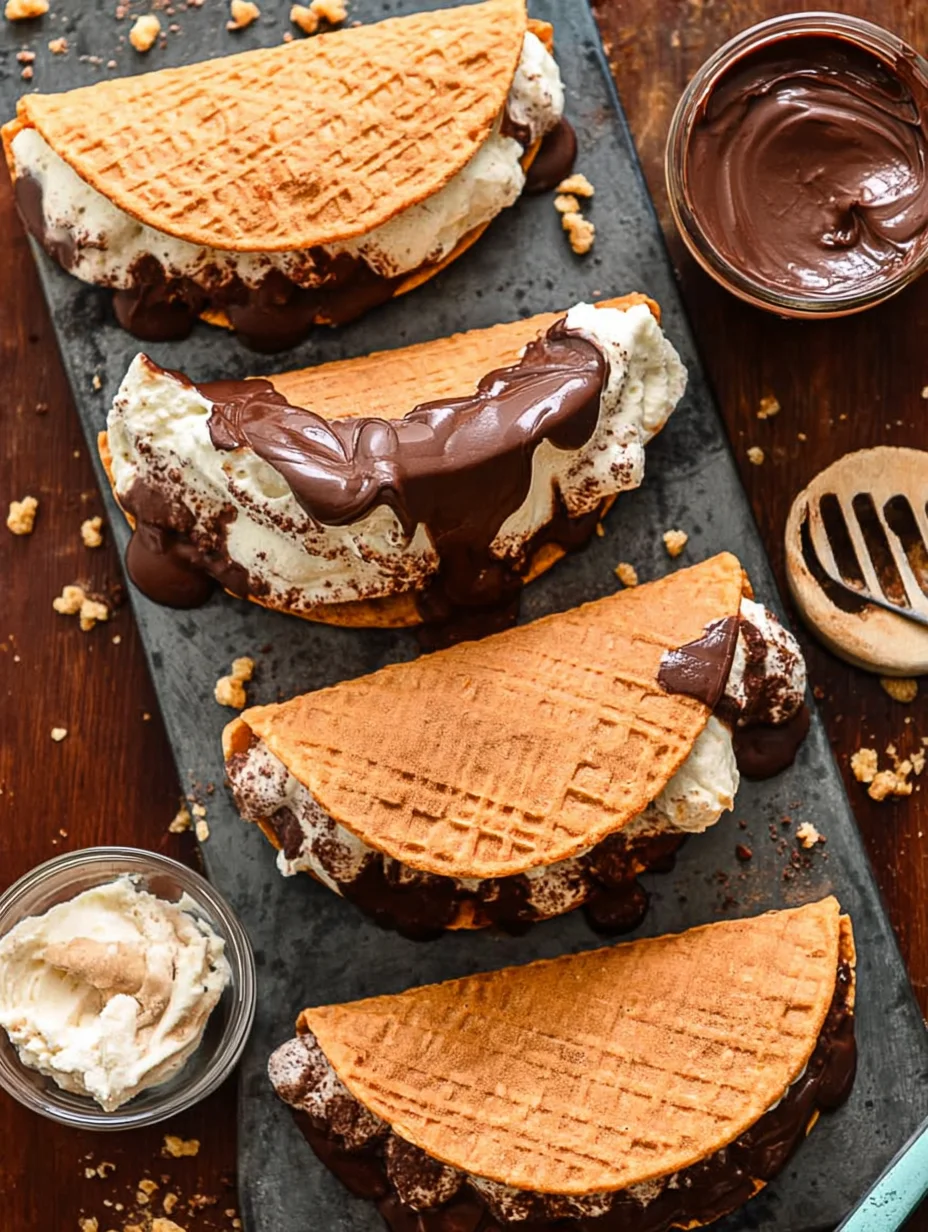
Dip and Coat
Melt the chocolate with coconut oil over a double boiler until smooth and glossy, then dip the filled ends of your Homemade Choco Tacos into it. Immediately roll in chopped peanuts for crunch, and place on a parchment-lined tray to set in the fridge. This step takes just minutes but transforms simple shells into irresistible treats. Check out my truffles au speculoos recipe for more chocolate dipping tips.
Ingredients
- 1 cup all-purpose flour
- 1/4 cup unsweetened cocoa powder
- 1/2 cup granulated sugar
- 2 large eggs
- 1/4 cup unsalted butter, melted
- 1/2 cup milk
- 1 teaspoon vanilla extract
- Pinch of salt
- 4 cups vanilla ice cream, softened
- 12 oz dark chocolate chips
- 2 tablespoons coconut oil
- 1 cup finely chopped peanuts
Homemade Choco Tacos Instructions
- In a bowl, whisk together flour, cocoa powder, sugar, eggs, melted butter, milk, vanilla, and salt until smooth. Let the batter rest for 10 minutes.
- Heat a waffle iron or non-stick skillet over medium heat. Pour 2-3 tablespoons of batter and spread into a thin circle. Cook for 1-2 minutes per side until crisp. Drape over a rolling pin to form taco shape; cool.
- Scoop 1/3 cup ice cream into each shell. Freeze for 15 minutes to firm up.
- Melt chocolate chips and coconut oil together. Dip ice cream ends into chocolate, then roll in peanuts. Freeze until set, about 30 minutes.
- Serve immediately or store in freezer.
Pro Tips for the Best Homemade Choco Tacos
Shape While Warm: Mold the waffle shells right after cooking for the perfect taco curve—they harden quickly.
Soften Ice Cream Just Right: Let it sit out for 5-10 minutes to scoop easily without melting into the shell.
Grab This Kitchen Scale Now — Best Precision Pick!

- Razor-Accurate Every Time: Dual-increment precision down to 0.1g — perfect for baking, meal prep, and portion control with g, oz, ml, and fl'oz modes.
- Smart Removable Bowl Design: Detachable bowl doubles as a protective case for compact storage. Tare function lets you weigh ingredients in any container with zero fuss.
- Built for Everyday Convenience: Auto-zero, tare function, low battery alert, overload indicator, and 2-minute auto-off to extend battery life — all in a sleek stainless steel build.
- ✓ "Perfect for baking — precise, lightweight, and stores easily without wasting counter space"
- ✓ "A game changer! Weighing ingredients is now way more accurate than measuring cups"
- ✓ "Love the 0.1g precision and backlight — best food scale I've owned. Highly recommend!"
⏰ Only a few items left in stock - order soon
Use Dark Chocolate: It balances the sweetness and gives a professional shine to your Homemade Choco Tacos.
You Must Know
- Homemade Choco Tacos are best eaten fresh, but freezing works well for storage.
- The shells contain gluten, so swap flour for a gluten-free blend if needed—try my gluten-free apple mille-feuille for inspo.
- Peanuts can be swapped for other nuts like pecans for variety.
- Total yield is about 8-10 tacos, depending on shell size.
How to Store Homemade Choco Tacos
To keep your Homemade Choco Tacos fresh, wrap each one individually in plastic wrap and store in an airtight container in the freezer for up to a week. Avoid the fridge, as the chocolate might soften. For reheating, let them thaw slightly at room temperature or enjoy straight from the freezer for that perfect crunch.
Customizing Your Homemade Choco Tacos
Get creative with your Homemade Choco Tacos by using chocolate ice cream inside or adding caramel drizzle before dipping. If nuts aren’t your thing, try crushed pretzels for a salty twist. For a fruity version, mix in diced strawberries—I’ve even linked this to my lemon curd tartlets for citrus ideas. Sub dairy-free ice cream for vegan options without sacrificing taste.
What to Serve with Homemade Choco Tacos
Pair your Homemade Choco Tacos with fresh summer berries or a light fruit salad to cut through the richness. For beverages, try cold milk, iced coffee, or a fizzy root beer float. If you’re feeling fancy, add a scoop of sorbet on the side. These accompaniments make the dessert feel like a complete treat without overwhelming the flavors.

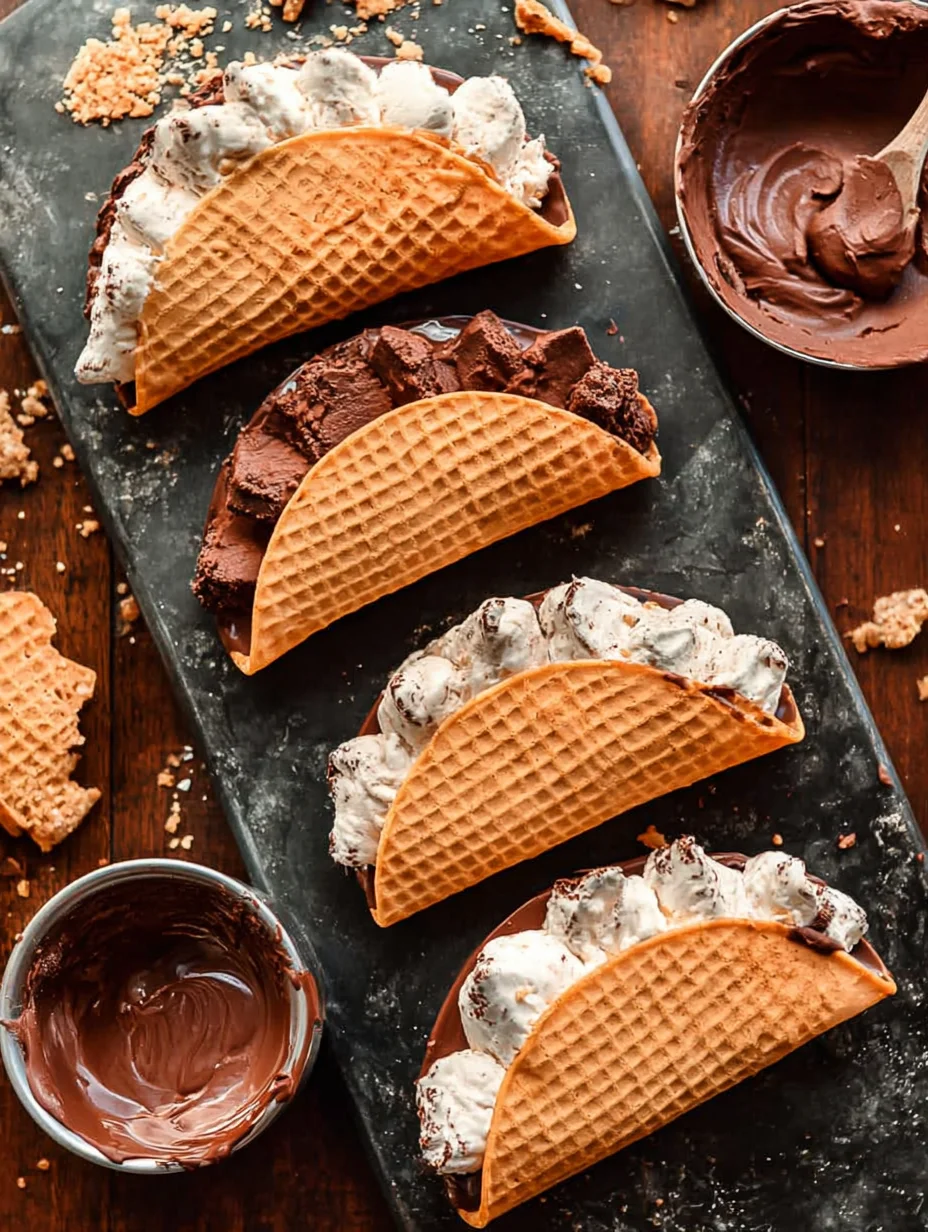
Homemade Choco Tacos
These homemade Choco Tacos are a fun, nostalgic treat that's perfect for summer! No churn fudge-swirled vanilla ice cream is stuffed inside a sweet and crispy waffle cone, then the whole thing is dipped in a chocolate and chopped peanut mixture.
Timing
Recipe Details
Ingredients
- 01 2 cups heavy cream (cold)
- 02 1 14oz can sweetened condensed milk
- 03 1 tbsp vanilla bean paste (or 2 tsp vanilla extract)
- 04 salt (pinch)
- 05 2 tablespoons cocoa powder
- 06 2 tablespoons granulated sugar
- 07 2 tablespoons heavy cream
- 08 1 tablespoon unsalted butter
- 09 1/2 teaspoon vanilla extract
- 10 salt (pinch)
- 11 2 egg whites
- 12 3 1/2 tablespoons granulated sugar
- 13 3 1/2 tablespoons brown sugar
- 14 3/4 teaspoon vanilla extract
- 15 1/8 teaspoon salt
- 16 2/3 cup flour
- 17 2 tbsp butter (melted)
- 18 1 1/2 cups chocolate chips
- 19 1 1/2 tablespoon coconut oil
- 20 3/4 cup peanuts (finely chopped)
Instructions
Make the fudge sauce for the ice cream ripple. In a small saucepan, whisk together the cocoa powder, sugar and heavy cream over medium-low heat. Once it starts to heat up, add in the butter and whisk until the butter is melted and the mixture is smooth and shiny. Remove from heat and whisk in the vanilla and salt. Set aside to cool.
Prepare the ice cream base. Add heavy cream to a stand mixer (or a bowl with a hand mixer) and beat until stiff peaks form (a few minutes). In a large bowl, mix together condensed milk, vanilla bean paste and salt. Add about 1 cup of the whipped cream in and gently fold it in, then add in the remaining whipped cream and fold until no lumps remain.
Layer the ice cream. Pour 1/4 of the ice cream base into a loaf pan, then drizzle on 1/3 of the fudge sauce. Repeat 3 more times, finishing with a layer of ice cream. Freeze until set – about 3 hours.
Make the waffle cones. Add egg whites, both sugars and vanilla extract to a bowl and beat with a hand mixer until well combined. Add in salt and half of the flour and continue mixing until smooth. Add in remaining flour and melted butter and mix until a smooth batter forms. The batter should be thick. Preheat waffle cone maker to just above medium heat. Place one heaping tablespoon of batter in the center of the waffle cone maker, then close it. Every waffle cone maker will cook differently, but ours took about 3 minutes to get golden brown. Remove with tongs, let cool for a few seconds, then (carefully) shape into a taco shape with your hands and hold in place for 15 seconds. They will harden in less than a minute.
Scoop ice cream into shells and freeze briefly. Scoop slightly softened ice cream into each of the “taco” cones, using a small spatula or the back of a spoon to smooth out the ice cream. Place in freezer for 10-15 minutes.
Prepare peanut-chocolate topping and assemble. Add chocolate chips and coconut oil to a microwave safe bowl. Microwave in 30 second intervals, stirring well between each interval, until fully melted. Stir in chopped peanuts. Dip the top of ice cream taco in the chocolate peanut mixture. Return to freezer for 5-10 minutes, or until hardened. Keep stored in freezer.
FILED UNDER:
NUTRITION FACTS (PER SERVING)
Nutrition information is calculated using an ingredient database and should be considered an estimate. In cases where multiple ingredient alternatives are given, the first listed is calculated for nutrition. Garnishes and optional ingredients are not included.
Frequently Asked Questions About Homemade Choco Tacos
Can I make Homemade Choco Tacos ahead of time?
Yes, you can prepare the shells and chocolate coating a day in advance, then assemble when ready. Just store unfilled shells in an airtight container at room temp. Fill and dip right before serving for the best texture.
How long does Homemade Choco Tacos last in the fridge?
Homemade Choco Tacos aren’t ideal for the fridge due to the ice cream; freeze them instead for up to 7 days. If you must refrigerate briefly, consume within 2 days to avoid sogginess. Always wrap well to prevent freezer burn.
Are Homemade Choco Tacos gluten-free?
Standard recipes use flour, so no—but you can easily make them gluten-free with a 1:1 substitute. Check my gluten-free desserts for more tips. It keeps the crispiness intact.
What’s the best ice cream flavor for Homemade Choco Tacos?
Vanilla is classic, but chocolate or coffee works wonderfully in Homemade Choco Tacos. Experiment based on your crowd—mint chip adds a refreshing twist. The key is a creamy texture that holds shape.
Can I bake the shells instead of using a waffle iron?
Absolutely, spread the batter thin on a baking sheet at 350°F for 8-10 minutes. Cool and shape quickly. It’s a great alternative if you don’t have the right tool.
How do I prevent the Homemade Choco Tacos from leaking?
Chill the filled shells for 15 minutes before dipping to firm up the ice cream in your Homemade Choco Tacos. Use less filling if needed, and ensure the chocolate seals the ends well. Patience here pays off.
Are there nut-free options for Homemade Choco Tacos?
Yes, skip the peanuts and use sprinkles, crushed cookies, or shredded coconut instead. It keeps the crunch without allergens. Always check for cross-contamination.
Can kids help make Homemade Choco Tacos?
Definitely—they’ll love scooping ice cream and dipping. Supervise the hot chocolate part. It’s a fun, hands-on activity that builds memories.
Final Thoughts
There’s nothing quite like biting into a Homemade Choco Tacos—the crisp shell, the creamy heart, and that chocolatey crunch all come together in pure bliss. I’ve shared this recipe because it’s become a staple in my home, perfect for any occasion. Give it a try this weekend; your taste buds (and family) will thank you. Drop a comment below on your twists!