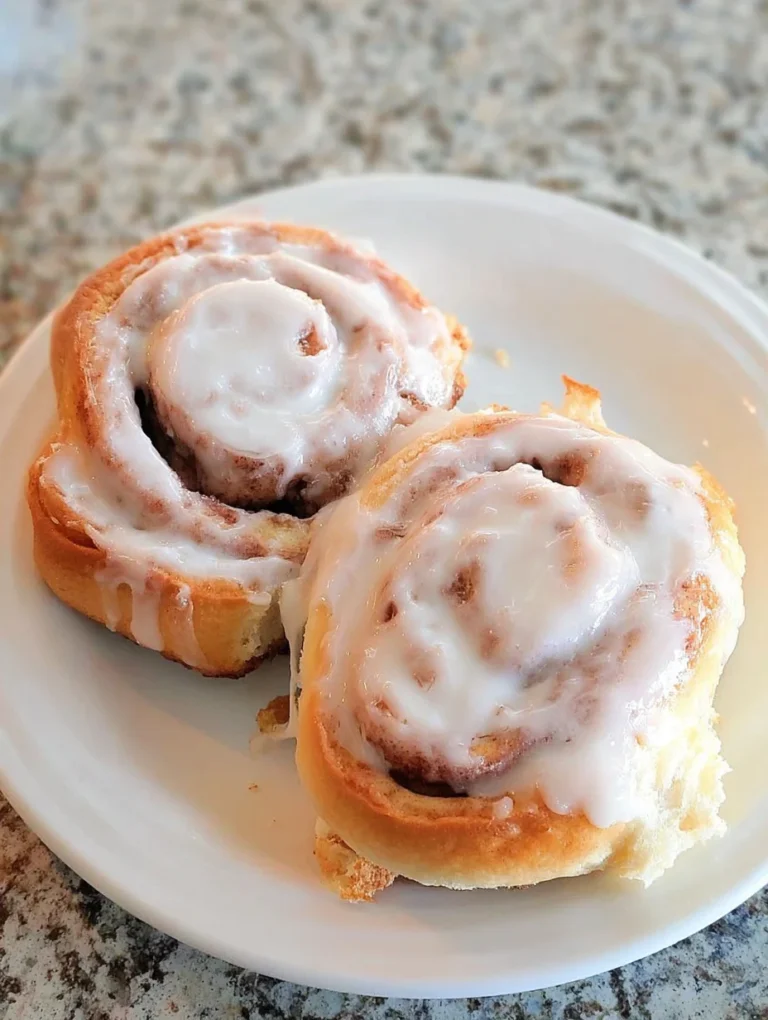
BEST Homemade Cinnamon Rolls

There’s something magical about the aroma of fresh-baked Homemade Cinnamon Rolls wafting through the house on a lazy weekend morning. I remember the first time I attempted these, fumbling through the dough like a novice baker, but the result was pure bliss—soft, gooey centers swirled with cinnamon and topped with creamy icing. If you’ve ever dreamed of skipping the store-bought versions and creating your own batch of Homemade Cinnamon Rolls, you’re in for a treat. In my experience, nothing beats that homemade touch that makes every bite feel like a warm hug.
These Homemade Cinnamon Rolls aren’t just any pastry; they’re a labor of love that rewards you with layers of flavor and texture. I’ve tweaked this recipe over years of trial and error, drawing inspiration from family traditions and a bit of experimentation in my own kitchen. Whether you’re prepping for brunch or a cozy family gathering, this guide will walk you through every step with ease. Get ready to impress everyone with your Homemade Cinnamon Rolls—trust me, they’ll be begging for seconds!
Key Takeaways:
- Homemade Cinnamon Rolls offer unbeatable freshness and customization that store-bought can’t match.
- The recipe takes about 2-3 hours total, including rising time, making it perfect for weekend baking without all-day commitment.
- Expect rich, spicy cinnamon flavor balanced with sweet, tangy icing for an indulgent treat.
- Activate yeast properly and don’t rush the rising for the fluffiest Homemade Cinnamon Rolls.
- Store leftovers in an airtight container for up to 3 days; reheat gently to restore that just-baked warmth.
Why You’ll Adore This Homemade Cinnamon Rolls
Ultimate Comfort Food: These rolls wrap you in nostalgia with their soft dough and cinnamon swirl, reminding me of holiday mornings gone by. What I love most is how they bring people together around the table, sparking conversations and smiles. You’ll find yourself reaching for another before you know it.
Grab This Chef Knife Now - Almost Gone!

- Stays Razor-Sharp: Ice-hardened blade keeps its edge longer than ordinary knives
- Superior Grip Control: Unique finger hole design gives you perfect balance and safety
- Built to Last a Lifetime: Premium stainless steel blade with elegant beech wood handle
- ✓ Finally, a knife that stays sharp and feels comfortable in my hand
- ✓ Professional quality without the premium price tag
- ✓ Makes meal prep faster and more enjoyable
⏰ Only a few items left in stock - order soon
Easy to Personalize: From adding nuts to tweaking the icing, these Homemade Cinnamon Rolls adapt to your taste buds effortlessly. I’ve experimented with flavors like orange zest, and it always turns out fantastic. It’s that flexibility that keeps me coming back to this recipe week after week.
Healthier Twist Possible: While indulgent, you can swap in whole wheat flour for a nuttier profile without sacrificing tenderness. In my experience, this makes Homemade Cinnamon Rolls feel a tad guilt-free. Plus, the natural ingredients shine through in every delicious bite.
Impresses Every Time: Serving these warm from the oven is a surefire way to wow guests or treat your family. The ooey-gooey centers and glossy topping create a bakery-worthy presentation. Let’s be honest, who wouldn’t love waking up to these beauties?
Essential Ingredients for Homemade Cinnamon Rolls
Active Dry Yeast: This is the magic behind the rise, transforming simple flour and liquids into fluffy dough. I always proof it in warm milk to ensure it’s alive and kicking—nothing worse than flat rolls! For Homemade Cinnamon Rolls, using fresh yeast guarantees that perfect airy texture we all crave. It’s a small step that makes a big difference in the final product.
Ground Cinnamon: The star of the filling, this warm spice infuses every layer with its signature aroma and taste. I’ve found that high-quality cinnamon elevates the rolls from good to unforgettable. Mixed with brown sugar and butter, it creates that irresistible swirl. Don’t skimp here; it’s what defines Homemade Cinnamon Rolls.
Cream Cheese for Icing: Softened cream cheese adds a tangy contrast to the sweet powdered sugar glaze, making the topping creamy and addictive. In my kitchen, I blend it with vanilla for extra depth. This icing is the crowning glory on your Homemade Cinnamon Rolls, dripping just right over the warm buns.
How to Make Homemade Cinnamon Rolls
Prepare the Dough
Start by warming your milk and dissolving the yeast with a touch of sugar—watch it bubble to life, which takes about 5-10 minutes. In a large bowl, mix in flour, remaining sugar, melted butter, egg, and salt until a soft dough forms. Knead on a floured surface for around 8 minutes until smooth and elastic; this is where the Homemade Cinnamon Rolls get their tender crumb. Let it rest in a greased bowl, covered, in a warm spot for the first rise, about an hour, until doubled.
Make the Filling and Roll Out
While the dough rises, stir together softened butter, brown sugar, and cinnamon for the filling— the scent alone will have you excited. Punch down the risen dough and roll it into a 16×12-inch rectangle on a lightly floured counter. Spread the filling evenly, leaving a border, then tightly roll from the long side like a jelly roll. This step is key for those beautiful spirals in your Homemade Cinnamon Rolls.
Slice, Rise, and Bake
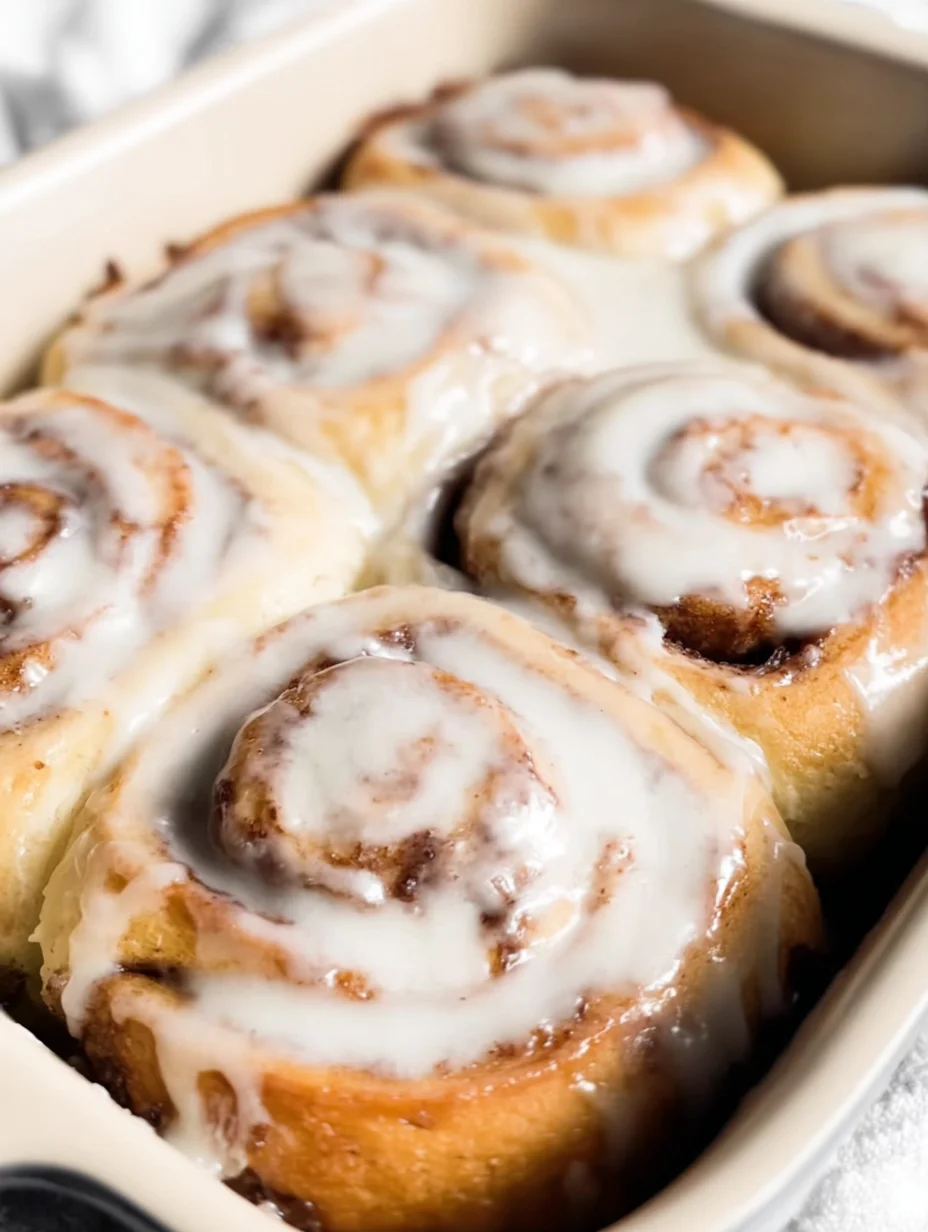
Using a sharp knife or floss, cut the log into 12 even slices and place them cut-side up in a greased baking dish. Cover and let rise another 45 minutes until puffy; preheat your oven to 350°F in the meantime. Bake for 20-25 minutes until golden, then cool slightly before icing. Your Homemade Cinnamon Rolls will emerge soft, fragrant, and ready to devour—pure perfection!
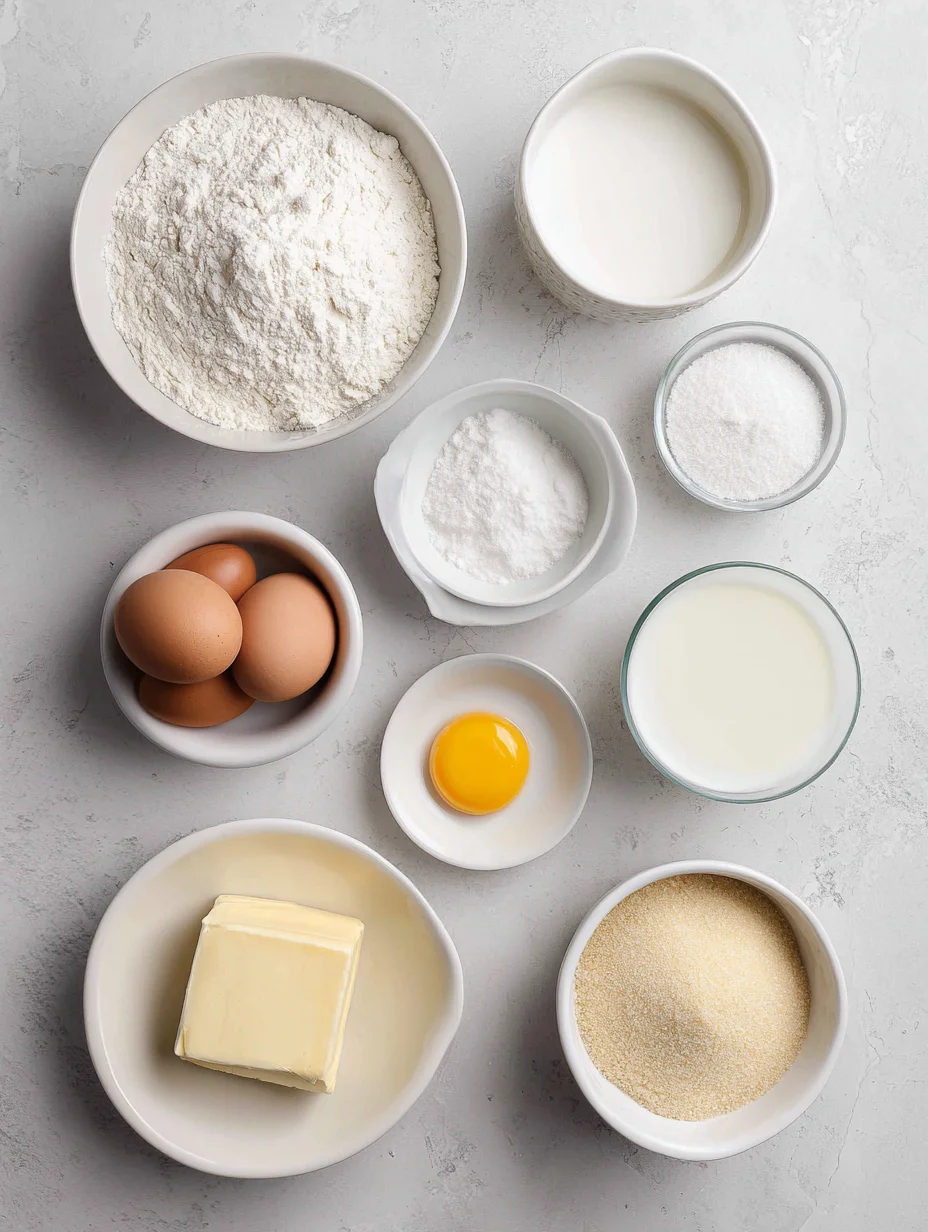
Ingredients
- For the Dough:
- 1 cup warm milk (110°F)
- 2 1/4 teaspoons active dry yeast
- 1/2 cup granulated sugar
- 1/3 cup unsalted butter, melted
- 1 large egg
- 4 cups all-purpose flour
- 1 teaspoon salt
- For the Filling:
- 1/2 cup unsalted butter, softened
- 1 cup brown sugar, packed
- 2 1/2 tablespoons ground cinnamon
- For the Icing:
- 8 oz cream cheese, softened
- 1/4 cup unsalted butter, softened
- 1 1/2 cups powdered sugar
- 1 teaspoon vanilla extract
- 2-3 tablespoons milk
Homemade Cinnamon Rolls Instructions
- Warm the milk and stir in yeast and 1 tablespoon sugar. Let sit 5-10 minutes until foamy.
- In a mixer, combine yeast mixture with remaining sugar, melted butter, egg, flour, and salt. Knead until smooth, about 8 minutes.
- Place dough in greased bowl, cover, and let rise 1 hour until doubled.
- Mix filling ingredients. Roll dough into 16×12 rectangle, spread filling, and roll tightly.
- Cut into 12 slices, place in greased 9×13 dish, cover, and rise 45 minutes.
- Bake at 350°F for 20-25 minutes. Cool slightly.
- Beat icing ingredients until smooth and spread over warm rolls.
Pro Tips for the Best Homemade Cinnamon Rolls
Don’t Overheat the Milk: Too hot, and it kills the yeast—aim for 110°F for lively dough that rises beautifully.
Use Dental Floss for Slicing: It glides through the roll cleanly, preventing squished Homemade Cinnamon Rolls.
Freshly Grated Nutmeg Boost: Add a pinch to the filling for subtle warmth that elevates the classic flavor.
Grab This Kitchen Scale Now — Best Precision Pick!

- Razor-Accurate Every Time: Dual-increment precision down to 0.1g — perfect for baking, meal prep, and portion control with g, oz, ml, and fl'oz modes.
- Smart Removable Bowl Design: Detachable bowl doubles as a protective case for compact storage. Tare function lets you weigh ingredients in any container with zero fuss.
- Built for Everyday Convenience: Auto-zero, tare function, low battery alert, overload indicator, and 2-minute auto-off to extend battery life — all in a sleek stainless steel build.
- ✓ "Perfect for baking — precise, lightweight, and stores easily without wasting counter space"
- ✓ "A game changer! Weighing ingredients is now way more accurate than measuring cups"
- ✓ "Love the 0.1g precision and backlight — best food scale I've owned. Highly recommend!"
⏰ Only a few items left in stock - order soon
You Must Know
- Yeast needs warmth to activate; cold ingredients lead to poor rise in Homemade Cinnamon Rolls.
- Brown sugar in the filling provides moisture for gooey centers.
- Let rolls cool 10 minutes before icing to avoid a runny glaze.
- High-altitude bakers may need to reduce baking powder if adapting, but this recipe uses yeast primarily.
How to Store Homemade Cinnamon Rolls
To keep your Homemade Cinnamon Rolls fresh, store them in an airtight container at room temperature for up to 2 days. For longer, refrigerate them covered for 5 days, though the texture softens slightly. Reheat in a 300°F oven for 10 minutes or microwave briefly to revive that soft warmth—I’ve found this method works wonders without drying them out.
Customizing Your Homemade Cinnamon Rolls
Feel free to swap half the flour for whole wheat for a heartier version, or add chopped pecans to the filling for crunch. If you’re vegan, use plant-based milk, butter, and a flax egg substitute—these tweaks keep the essence of Homemade Cinnamon Rolls intact. For a citrus twist, incorporate orange zest into the icing; it’s one of my favorites, inspired by this orange and cardamom muffins recipe.
What to Serve with Homemade Cinnamon Rolls
Pair these rolls with a hot cup of coffee or tea to balance the sweetness, or try fresh fruit like berries for a refreshing contrast. For a full brunch, add scrambled eggs and bacon on the side—simple yet satisfying. In my experience, serving them alongside yogurt parfaits, like those in our frozen yogurt granola cups recipe, makes for a delightful spread that everyone loves.

BEST Homemade Cinnamon Rolls
These are the absolute BEST cinnamon rolls ever!! With a pillowy soft homemade dough, sweet cinnamon filling, and ooey gooey cream cheese frosting, there's no better treat!
Timing
Recipe Details
Ingredients
- 01 4-5 cups all-purpose flour (spooned and leveled (520g-650g))
- 02 1/4 cup granulated sugar ((50g))
- 03 2 1/4 teaspoons instant yeast ((1 package))
- 04 1/2 teaspoon salt
- 05 3/4 cup water ((180mL)*)
- 06 1/2 cup whole milk ((120mL))
- 07 1/4 cup unsalted butter ((60g), cut into 4 slices)
- 08 1 large egg (at room temperature)
- 09 6 tablespoons unsalted butter ((85g), very soft)
- 10 3/4 cup packed brown sugar ((150g), light or dark)
- 11 1 1/2 tablespoons ground cinnamon
- 12 4 oz full fat block cream cheese ((115g), room temperature)
- 13 5 tablespoons unsalted butter ((70g), room temperature)
- 14 1 1/2 cups powdered sugar ((195g))
- 15 1 teaspoon pure vanilla extract
Instructions
In a large bowl, combine 3 cups of flour (to start), sugar, yeast, and salt. Whisk to combine and set aside.
In a medium microwave safe bowl or cup, combine water, milk, and sliced butter. Microwave in 10 second bursts until the butter just melts and the mixture feels warm but not hot. You can also do this with a pot placed on a stove burner set to low heat.
Whisk the egg into the water mixture to combine.
Pour the wet ingredients over the flour mixture. Using a wooden spoon, mix together until you have a very thick and sticky dough.
Add another 1 cup of flour to the dough and mix until it starts coming together into ball.
This next step can be done directly in your bowl or on a lightly floured work surface. Knead the dough, adding flour as needed to keep it from sticking to your hands / the sides of the bowl, until it's smooth, elastic, and slightly tacky. If you poke the top of the dough, it should spring back - if the indent remains, the dough needs more kneading.
Cover the dough and set aside for about 20 minutes. The dough will puff up slightly but won't double in size. This is just to relax the gluten and make the dough easier to roll without it pulling in on itself.
Turn the rested dough onto a lightly floured work surface and roll it out into a roughly 14x10 inch rectangle. Use your hands to press and pull the edges to get as nice of a rectangular shape as you can - it doesn't have to be perfect though!
Spread the softened butter over the dough, leaving a roughly 1/2 inch boarder along the edges. Sprinkle the sugar on top and use your hands to spread it out into an even layer over the butter. Finally, sprinkle the cinnamon evenly on top.
Working from the longer side of the dough, roll it up into a log.
Cut about 1/2 an inch off each end of the log (this just makes for nicer and more uniform rolls - you can bake them off separately or just skip this step if you don't mind the appearance).
Use a sharp serrated knife or unflavored dental floss to cut the log into 12 even rolls. If using a knife, cut the rolls using a sawing motion to prevent squishing. If using floss, break off a large string of unflavored dental floss and wiggle it under your log of dough positioned where you'd like to cut. Lift the ends of the floss up and over the log and cross to form an X. Pull on the ends of the floss to cut through the dough (see above post for visual).
Arrange the rolls cut side up in a 9x13 inch baking dish. There should be a tiny bit of space between each roll but it's fine if they're touching.
Cover the rolls and set aside in a warm place for about 45 minutes or until about doubled in size. My favorite place to keep cinnamon rolls during this time is in the oven (it shouldn't be on or hot) just because it keeps the rolls safe from any cold drafts. They'll be pressed up against each other once they puff up - that's normal!
Uncover the rolls and place into the center of your preheated oven. Bake for 25 to 30 minutes or until a nice golden brown on top. Set aside while you make the icing.
In a medium sized bowl, combine icing ingredients. Using an electric mixer fitted with the paddle attachment or a wooden spoon by hand, cream together until smooth. If using a mixer, start on low speed just to incorporate everything together and then whip on medium speed to smoothen the mixture out.
While the cinnamon rolls are still warm, spread the icing on top. It'll melt slightly and make them extra gooey!
FILED UNDER:
NUTRITION FACTS (PER SERVING)
Nutrition information is calculated using an ingredient database and should be considered an estimate. In cases where multiple ingredient alternatives are given, the first listed is calculated for nutrition. Garnishes and optional ingredients are not included.
Frequently Asked Questions About Homemade Cinnamon Rolls
Can I make Homemade Cinnamon Rolls ahead of time?
Absolutely, prepare the rolls up to the second rise, then cover and refrigerate overnight. In the morning, let them come to room temperature for 30 minutes before baking. This method saves time and lets the flavors develop even more.
How long does Homemade Cinnamon Rolls last in the fridge?
They’ll stay fresh for up to 5 days when stored airtight. For best taste, enjoy within 3 days. Freeze unbaked rolls for up to a month if you want to bake fresh later.
Can I use instant yeast for Homemade Cinnamon Rolls?
Yes, instant yeast works great and skips the proofing step—just mix it directly with dry ingredients. Reduce the amount slightly to 2 teaspoons. I’ve done this for quicker prep without any issues.
What if my dough is too sticky?
Add flour a tablespoon at a time while kneading until it pulls away from the bowl. For your Homemade Cinnamon Rolls, aim for tacky but not glue-like dough. This ensures easy rolling later.
Are Homemade Cinnamon Rolls gluten-free possible?
Yes, use a 1:1 gluten-free flour blend and add xanthan gum if needed. Test with a small batch first. The results can be surprisingly close to the original.
How do I know when Homemade Cinnamon Rolls are done baking?
Look for golden tops and a hollow sound when tapped; internal temp should hit 190°F. Overbaking dries them out, so watch closely the first time. Your Homemade Cinnamon Rolls should be soft and fragrant when perfect.
Can I add raisins to the filling?
Definitely—plump them in warm water first for juiciness. They add a chewy contrast that’s lovely in Homemade Cinnamon Rolls.
Why are my rolls dense?
Often, it’s under-kneading or expired yeast. Ensure proper rising times too. With practice, your Homemade Cinnamon Rolls will be light and fluffy every time.
Final Thoughts
There’s truly nothing like pulling a pan of Homemade Cinnamon Rolls from the oven, their cinnamon swirls glistening under that perfect icing. This recipe has become a staple in my home, bringing joy to every occasion it’s made. I encourage you to roll up your sleeves and give these Homemade Cinnamon Rolls a try—you won’t regret it, and your kitchen will smell like heaven. Share your results or variations in the comments; I’d love to hear how they turn out for you!